This page includes:
- Kernel settings
- CWM settings
- TWRP settings
Warning: I am not responsible for bricked devices or you getting fired because your alarm app failed to wake you up. Only you are held responsible for making the modifications.
Kernel settings guide
Updated: 22/12/16
Q. What is BLN?
A. The BLN turns the touchkey backlights into a notification led.It enables any android application to use the touchkey backlights of your phone as a notification led.
Q. What is BLNWW?
A. BLNWW (Blink light notification without wakelock) is essentially BLN that won't wake your phone up from sleep state. Basically, deep sleep is uninterrupted to improve battery life.
Q. "What are these modes: IDLE, LPA and AFTR?" - For older devices only
A. Between screen off and deep sleep states, there are some idle modes supported by cpuidle driver. They are IDLE aka Normal Idle, LPA aka Deep Idle and AFTR aka ARM Off Top Running. Race to idle by CPU is implemented for power management.
In IDLE state, CPU is not clocked anymore, but no hardware is powered down.
In deep idle (LPA),a state after IDLE, again, the cpu is not clocked anymore like we guessed but some parts of hardware are powered down. Deep idle brings in real power savings and there is no need of putting a hard limit to frequency during screen-off; using a screen-off profile. (Good practice is to use a governor with built in screen off profile, than using an user-configured screen-off profile by putting a hard limit on frequency). Deep idle is not used when device is entering deep sleep and also when device is woken from suspend/deep sleep. While entering/exiting DEEP IDLE, CPU is set statically to SLEEP_FREQ and is not clocked below or above until it exits this state.
AFTR is a patch to support Top=Off mode for deep idle. Level 2 cache keeps it data during this mode.
We can have IDLE or AFTR modes with LPA enabled or disabled. (Obviously it is not possible to have IDLE and AFTR together)
Values:
0: IDLE
1: AFTR
2: IDLE+LPA
3: AFTR+LPA
Q. "What idle modes are recommended for power saving? How do i change it?" - For older devices only
A. Recommended for power saving is to enable AFTR and LPA, ie value 3
Example:
echo "3" > /sys/module/cpuidle/parameters/enable_mask
Q. What is KSM?
A. Kernel same-page merging (KSM) is a memory-saving de-duplication feature developed by Red Hat and first introduced in linux version 2.6.32. In simple, it allows different processes which have identical portions of data to share the same memory pointer reducing the RAM used. There is however a slight performance hit requiring CPU cycles to check which memory portions can be 'merged' in set intervals which may negate any performance benefits.
Q. What is entropy?
A. Entropy is the randomness collected by an operating system which is used for cryptography and other uses requiring random data. The randomness is usually collected from hardware events such as touch input which is then stored into an entropy pool. A lack of entropy will have a negative impact to performance and security.
A. ZRAM basically compresses unused apps within the system RAM. This allows the system to swap less needed processes to the zram partition for faster access at a later time, instead of killing them. This does take up some of your ram though, so I imagine that the value you are setting is determining exactly what percentage of your ram that the zram partition is allotted.
Q. What is a SWAP?
A. In simple, swap uses a pre-configured space within your internal storage as an overflow for when your RAM is full. Since internal storage is much slower than RAM, this can have a negative effect to performance requiring additional CPU power. By default, the swappiness variable is set to 60. It is not recommended to set this too high as it may drain your battery faster or too low if you are on a device that has small amounts of RAM (1GB or less).
Q. What is VNSWAP?
A. Samsung's replacement for ZRAM. It compresses 50% of your RAM in order to provide a smoother multitasking experience at a cost of slightly reduced power efficiency. It comes enabled by default in recent Samsung devices and it is not recommended to be disabled.
Q. What is Multicore Power Saving?
A. A kernel feature that attempts to schedule tasks to cores that are awake in effort of saving battery life. Please note that hotplugging already provides load balancing of cores, so it isn't really necessary to have this enabled. You should only set this to "disabled" or "aggressive" as having this set to "enabled" will usually yield no benefit. It is recommended however to have this disabled.
Q. What is fsync?
A. A system call in Linux/Unix that 'flushes' cached buffers to a storage device so that changed information can be retrieved in an event of a system crash or reboot. By default this is enabled for file integrity and security reasons, however some developers or users like to disable fsync for slightly improved performance. It isn't recommended that you disabled this because you could potentially lose important data if your phone isn't shut down correctly.
Q. What is dynamic fsync?
A. It is an automatic fsync controller which disables fsync when screen is ON which gives better performance and enables it back when screen is OFF and resumes the pending disk writes which avoids data loss. This is better than manual FSYNC control as it operates itself automatically. Having this enabled could still pose a risk of data loss in event of a system crash.
Q: What is the best CPU Governor?
A: It depends what do you mean about 'best', saying 'best' could refer to the battery life, performance, stability, etc. Elaborate your question to a more clear question.
Q: What is the best I/O Scheduler?
A: Same thing as the previously answered question. However, often people talk about the speed, reliability and stability of an I/O Scheduler
Q. "What does Thermal Throttle do?"
A. Thermal throttle is a system put in place to basicly stop your phones internal chips from cooking them selves! When a temperature reading reaches a condition the CPU limits its performance until the temperature reaches safe levels again. You might notice lags in games while this is happening as thermal throttle only really tends to take place during prolonged CPU intensive operations like gaming or during a reboot. You can see if thermal throttle is taking place if your CPU speeds are limited, check back after a few minutes with your screen being off and things should return to normal. You can increase the temperature at which thermal throttle takes place but personally I don't advice this in case you increase the level too much much and you can cause perminant damage or burn your CPU and require potential expensive repairs. Ambient air temperature can influence the chances of being throttled.
Q: "What is Undervolting?"
A. Undervolting is making your phone's components run at a voltage lower than the manufacturer specifications. The only benefit that undervolting can provide is better thermals, which can improve the lifespan of your device when using CPU intensive tasks. The danger of undervolting is that having too little voltage will make your device unstable causing problems such as sudden freezing or sleep-of-deaths (SODs). One common misunderstanding is that undervolting should translate to better battery life. While this may seem true on paper, real world results may show that there is no, if not very little impact to battery savings. Undervolting the CPU alone may not be enough to see a noticeable benefit, it may be required to undervolt the GPU and bus in order to see some difference in results.
Q. "How can I use Gamma Control?"
A. What is gamma? The gamma setting sets the color range for the screen. You can compare it to the contrast. We all know that the touchscreen eats most of the power compaerd to all other components in a smartphone! A lower brightness causes less power consumption and a lower gamma or contrast range alos helps a little bit to save power. The number range for gamma depends on the kernel and usually you change this with a slider.
Q. "What is F2FS?"
A."The Flash Friendly File System" created by Kim Jaegeuk (Samsung) and released in February 2013. Read more about F2FS here
A."The Flash Friendly File System" created by Kim Jaegeuk (Samsung) and released in February 2013. Read more about F2FS here
Q: My kernel doesn't have the option to change any of these settings, help!
A: You will have to change your kernel in order to change these settings
Q: Why can't my phone allow me to overclock or undervolt?
A: Most likely the kernel you are using doesn't support these functions. Read the kernel OP before flashing!
Q: What does the kernel version in the phone's settings tell me?
A: Like all operating systems, there must be some layer of software the provides all of the drivers for your phone. A newer version of a kernel (Linux for our case) doesn't necessarily mean that the kernel is better, usually it could provide bug fixes but most developers don't bother updating this anyway.
Q: Is there an app to change my kernel settings?
A: If you read the kernel OP, you would have known the compatible apps for your kernel. If it is not listed on the OP, you can try using Kernel Adiutor or ask on the kernel thread.
Q: Why does my battery drain faster when I flash a new kernel?
A: Kernels aren't developed to drain your battery, this could be caused by an inconsistency in code that may have broke something in the kernel causing battery drain (highly unlikely). You will have to go through a few power cycles (drain battery to a low percentage, recharge and repeat.
Q: What is the best kernel for XYZ rom?
A: Rule from XDA, no best ROM or best kernel, etc. Only recommendations can be given by users. Experiment yourself or find reviews on some combinations.
Q: Why should I switch kernels when the stock is good enough?
A: Custom kernels can provide extra functionality for your device that could improve performance and battery life. Sometimes installing a custom kernel can bring bug fixes earlier than a ROM update. If you think that playing with a custom ROM is too technical already, I don't recommend you to flash a custom kernel.
Q: The kernel I am using has an old recovery version, how do I update the recovery?
A: You can update the recovery in many ways such as by updating the kernel, switching kernels, flashing a newer custom recovery like Philz recovery, etc.
Q: Can I revert to stock kernel once I flash a custom recovery?
A: Usually you can only do this if you reflash the ROM that you were using. It is still unlikely to find a standalone package to do this.
Q: Why does flashing a ROM remove my custom recovery?
A: It is because most custom ROMs come with their own kernels

Q: Why does my screen turn black after the phone logo after flashing a kernel?
A: You have flashed the wrong version of kernel on your phone. Check the kernel OP before flashing!
Q. What is VPLL Mode?
A. VPLL mode is a mode that allows more frequency steps for the CPU therefore increasing performance but decreasing stability and battery life.
Q. What does fast charging do?
A. When set, the phone will charge off of the PC USB ports as if it is connected to wall outlet. This does turn off your access to the phone internal memory and SD card. If you want to access the internal storage on PC then you have to turn this off.
NOTE – Whether to turn on or off, has to be done before connecting to PC. Changing this after connecting has no effect.
NOTE – Whether to turn on or off, has to be done before connecting to PC. Changing this after connecting has no effect.
Q. What is slide-to-wake/swipe-to-wake?
A. If this is set, then you get to short circuit the process of waking the phone. What you need to do is slide through the capacitive buttons on your phone as if you are sliding the screen to unlock. This bypasses the step where you press power or home button to wake to lock screen and then actually unlock the phone.
Q. What does Internal and external read ahead do?
A. Both of these parameters control the size of the buffer. Internal refers to your Internal SD Card & External refers to the MicroSD card. Do note, the buffer resides in RAM. So if you set it too high then you won’t have free RAM to play with.
Q. Why is there a SCREEN OFF CPU governor?
A. As the name says, you get to set a different governer when screen is off. This will override what you chose in the governer choice. Pretty nifty arrangement so that you can flip from a performance governer when on screen and a power save governer when screen is off. This feature was added to the kernel because it was either the developers intention or by popular demand.
Q. Why is there a SCREEN OFF I/O scheduler?
A. Similar to the Governor, this will let you choose a different Scheduler for when the screen is off. This will override (when screen is off) what you set previously. This feature was added to the kernel because it was either the developers intention or by popular demand.
Q. What are TCP/IP PROTOCOLS AND CONGESTION ALGORITHMS:
A. TCP, part of the transport internet layer, provides intermediate communication between an application and a host. When sending large chunks of data, a program can issue a single request to TCP instead of breaking down data into a series of IP packets and requests.
For each connection TCP maintains a congestion window. The TCP congestion window is maintained by the sender and is used to prevent network congestion/overload due to packet loss. When packet acknowledgments are received, the size of the TCP congestion window increases exponentially until a timeout occurs or the receiver reaches its bandwidth limit. To prevent network overload TCP congestion avoidance algorithms modify TCP window size, "slow-start", and the slow-start threshold. Thus, TCP congestion avoidance algorithms have a significant impact on the speed of packet delivery between an application program and a web host.
Q. What is TCP congestion control?
A. TCP Congestion Control determines which algorithm is applied for the network congestion avoidance. You usually have two choices. Cubic & Reno. Cubic is less aggressive and Reno is more aggressive.
Development Questions
Q. What is Linaro?
A. Linaro is a not-for-profit (NFP) engineering organization that works on consolidating and optimizing open source software for the ARM architecture, including the GCC toolchain, the Linux kernel, ARM power management, graphics and multimedia interfaces.
A. Linaro is a not-for-profit (NFP) engineering organization that works on consolidating and optimizing open source software for the ARM architecture, including the GCC toolchain, the Linux kernel, ARM power management, graphics and multimedia interfaces.
Q. What is Sabermod?
A. SaberMod is a AOSP based ROM with some extra features added in and mostly from CyanogenMod. SaberMod started out pure AOSP when android 4.2.1 launched. Originally it was pure AOSP with a few extra features I ported over from CyanogeMod and linaro optimizations. Then I rebased everything off of rasbeanjelly because I liked many features found in rasbean. Since then I've modified a lot of the code so not much of it is rasbeanjelly based anymore. But you will still find some commonly used features found in rasbeanjelly. SaberMod is not a rasbeanjelly or CM clone, or KANG. Custom kernels are included for certain devices when available. These are personal builds we make for ourselves and originally became very popular in the nexus 7 forums. Features are very rarely added, and are built to SaberMod's team members liking. Currently there are two members of SaberMod working on this project. Myself and @jarjar124 . Please understand our time is limited and we are only two people who have lives, and do not have 25-50 members like CyanogenMod to add things. And our goal is not to add a bunch of features that bloat the system of the ROM.
CWM settings guide
Making a backup
Before you begin, ensure you have sufficient space for your backup.
Make sure that you do not have a password or screen lock pin when you backup your data
- Boot into Recovery Mode
- Select Backup and Restore
- Select Backup
- Follow on screen directions to complete the backup.
Restoring a backup
- Boot into Recovery Mode
- Select Backup and Restore
- Select Restore (or Advanced restore if you wish to restore only a portion of your device.)
- Follow on screen directions to complete the backup.
- Select your 'Device-ID' from the list (You will most likely only have one device listed)
- Select the backup you want to restore (Latest should be last on list)
- Follow on screen directions to complete
- Wait for it to complete.
Additional Commands
Most commands are fairly self-explanatory. Here are a few, with some definitions.
- reboot system now -- this will reboot the system into its normal boot mode
- install zip from sdcard -- This is used to flash a
.zipfile, located on the/sdcardpartition, which can be used to install new versions of CyanogenMod among other things. - apply update from sdcard --Installs the
update.ziplocated in the root of your SD card - wipe data/factory reset -- Obvious - clears everything (except your SD card, hopefully)
- wipe cache partition -- erases and formats
/cache- apply /sdcard/update.zip -- Installs the
update.ziplocated in the root of your SD card - choose zip from sdcard -- Lets you browse for and pick the update or installation
.zipfile - toggle signature verification -- Turns
zippackage signature requirement on/off - toggle script asserts
- advanced restore -- Allows you to select a backup, as well as select which portions of the backup to restore (such as the
/boot,/system,/data,/cache,/sd-ext)
- apply /sdcard/update.zip -- Installs the
- mounts and storage -- this allows you to mount or unmount the various partitions. Advanced users can access files on mounted partitions through adb.
- unmount
/cache - mount
/data - unmount
/sdcard - mount
/system - mount
/sd-ext - format
/cache - format
/data - format
/sdcard - format
/system - format
/sd-ext - mount USB storage
- unmount
- advanced -- more advanced options
- reboot recovery -- reboot the device back into recovery mode
- reboot bootloader -- reboot the device to the bootloader
- power off -- power down the device
- wipe dalvik cache -- wipe temporary files used by the Dalvik virtual machine. The Dalvik virtual machine is the 'sandboxed environment' which runs Android apps written in Java. This is generally safe to perform.
- report error -- copies
recovery.logto/sdcard/clockworkmod/. This log can then be submitted to developers using the ROM Manager application. - key test -- allows you to test your hardware keys on the device
- show log -- outputs the current recovery.log to the screen
- partition </path> -- allows you to create an
ext3orext4partition on your SD card. Allowed sizes range from 128M to 4096M. - toggle loki support -- enables flashing kernels on some Samsung devices
- wipe battery stats -- if you are having misreported battery strength, it may be useful to remove the battery stats history file [this feature was removed beginning with version 6.0.2.0 due to user misunderstanding over its use]
- fix permissions -- resets system permissions back to their default values [this feature was removed beginning with version 6.0.3.5 due to its placebo effect as a cure-all]
TWRP guide
Exploring the Main Menu
As soon as you boot your Android into the latest build of TWRP, the following menu will serve you, known as the main menu.
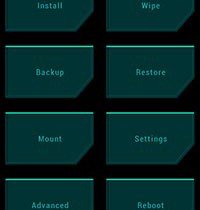

The main menu consists of 8 tabs (Install, Wipe, Backup, Restore, Mount, Settings, Advanced & Reboot), each having its own sub-tabs and functions. Let us now begin with the first tab on the screen.
Install
The Install tab is simple and make its role in flashing files (ROMs/Kernels/Mods). Another thing that is unique here, is that you can add a queue of files and the same will be flashed in the respective order.


Now, lets get to know how simply this works.
- Press on the “Install” tab.
- Browse and choose the file that you desire to flash.
- Press on Add more zips if you desire to flash another zip(s).
- Swipe the round button present on the bottom of the screen to initiate the flashing process.
Wipe
This tab serves the function of wiping the partitions on your device. Wipe-able partitions include System, Data, Cache, Dalvik Cache, Internal Storage and USB-OTG (if any). Wiping the partitions is necessary as a pre-flashing process and is different for Installing ROMs/Kernels/Mods and updating them. So, before you set yourself for opening this menu, make sure to know what you’re doing.
Advise: Backup your storage as sometimes when you’re in haste, you might mistakenly wipe it and lose all the data on your storage.

Here, I’m gonna mention some basic wiping steps for Installing ROMs/Kernels. Note that these are universal for every ROM and Kernel, until and unless the developer himself states some specific steps.
Wiping before Installing a Custom ROM:
- Press on “Wipe” tab.
- Press on “Advanced Wipe”.
- Select the partitions: Dalvik Cache, System, Data & Cache.
- Swipe the round button present on the bottom of the screen to initiate the wiping process.
Wiping before Installing a Custom Kernel:
- Press on “Wipe” tab.
- Press on “Advanced Wipe”.
- Select the partitions: Dalvik Cache & Cache.
- Swipe the round button present on the bottom of the screen to initiate the wiping process
Backup
The Backup tab holds a very important and useful function. Situations might arise when you accidentally Install a wrong (corrupted/damaged) or may be un-desirable ROM/Kernel/Mod. Post these situations, we find ourselves stuck. So, the Backup option gives us an helping hand to come out. This option is also well known asNandroid Backup, but is now certainly referred to as a common term; Backup.
TWRP offers some unique privileges in the Backup option too. A user can simply select the partitions that he/she might want to backup viz Boot (Kernel & Ram-disk), Recovery(Present Recovery), System (Firmware files), Data (User Apps and Information) & Cache(Dalvik Cache and Cache).

To Backup your current ROM, simply follow these steps:
- Press on “Backup” tab.
- Select the partitions you want to backup (Usually, ROM backup includes System, Data, Cache & Boot).
- Swipe the round button present on the bottom of the screen to initiate the backup process.
Apart from backing up, you can also Set Backup Name (set a specific name for your backup), Enable compression and Skip md5 generation during backup.
Restore
The Restore option in simple words, restores the Backup. A backup made with the Backup tab is to be restored from this tab. This option also allows you to delete a previous backup and even enable md5 verification.
Restoring a backup is quite easy:
- Press on “Restore” tab.
- Press on the backup you want to restore.
- Swipe the round button present on the bottom of the screen to initiate the restore process
Mount
It certainly is essential to mount partitions while flashing some specific files. Mount-able partitions includes: System, Data, Cache, Internal Memory, SD-card and USB-OTG (if any).
To mount a partition:
- Press on “Mount” tab.
- Select the partitions to mount.
Settings
This tab holds all the settings related to the recovery subsystem.


The following come under this tab:
- zip file signature verification (Enable flashing only if the zip file is signed properly).
- Use rm -rf instead of formatting (Option enables manual rm -rf command to wipe instead of automatic formatting)
- Skip md5 generation during backup (disables the generation of md5 sum during backup process)
- Enable md5 verification of backup files (enables restore of backup, only if md5 sum verifies)
- Use military time (Use the time format followed by Military/Army)
- Simulate actions for theme testing (enables modification of actions during theme testing)
- Time Zone (Set time zone according to your country)
- Screen (Enable/disable/set screen timeout)
- Restore defaults (Restores all the settings to their default value)
Advanced
It provides all the advance functions of the TWRP recovery.
Advanced functions include:
- Copy Log to SD (Transfers the error log generated to the SD card)
- Fix permissions (Fixes the permissions of the System files to fix errors)
- File Manager (In-built recovery file manager to manage files on Internal and External memory)
- Terminal Command (In-built terminal emulator to execute commands)
- Reload Theme (Reloads the theme from TWRP/theme, necessary when applying a new theme)
- ADB sideload (Initiates sideload over ADB to flash zips)
Reboot
This menu lists ways to reboot the device to various locations. You can reboot your device into the following modes just with a simple gesture. You can perform the following actions within the Reboot menu:
- System (Boot your device normally into the OS)
- Power Off (Powers down your device completely)
- Recovery (Reboots into the recovery mode)
- Bootloader (Reboots the device into bootloader/fastboot mode)
To reboot:
- Press on “Reboot” tab.
- Press on the desire button where you’re willing to boot.
- Swipe the round button present on the bottom of the screen to initiate the rebooting process.
All screenshot credits go to XDA author Matthew Brack
if i may make a suggestion for the future, i was hoping to find info on Entropy, Virtual Memory settings, KSM etc. i am not complaining though, this is the best concise yet comprehensive resource short of doing 400 searches on xda. :) thanks for all yr work!
ReplyDeleteCan do! This page is a little outdated now so I will gladly accept your suggestions :)
Deleteit's never outdate this kind of information, great work bro...
ReplyDelete